A barbell exposes every weakness in a lifter’s footing. Soft soles compress, loose heels slide, and a foot that rolls inward by a few degrees can turn a clean squat into a grind. Dedicated weightlifting shoes address these problems with a firm base, a raised heel and a secure fit. Not every pair does this equally well, though, and the choice depends on three details: sole firmness, heel height and fit.
Sole Firmness Sets the Floor
The first thing to check is how much the sole gives under pressure. A cushioned running shoe absorbs force, which is useful for a stride but unhelpful under 150 kg. Foam compresses unevenly, and the lifter has to correct for that shift on every rep.
A proper lifting sole is dense and incompressible. Force travels from the foot into the floor without being absorbed along the way, and balance stays predictable from the first rep to the last. Many lifters notice the difference on their first heavy set, when the bar feels steadier even though the weight has not changed.
You can test this in a shop by pressing a thumb firmly into the heel. A good lifting shoe barely dents. For online orders, look for words like rigid, dense or incompressible in the product description, and be cautious of anything that mentions cushioning as a main feature.
See also: Understanding Tourniquet Options for Professional Emergency Preparedness
Heel Height Changes How You Squat
Most lifting shoes carry a raised heel, typically between 15 and 25 mm. The angle shifts the body’s position in a squat, letting the knees travel forward while the torso stays more upright. That suits lifters with limited ankle mobility, and it helps in movements that demand an upright trunk, such as front squats, overhead squats and the catch position in the clean and snatch.
Choosing a height comes down to your build and your lifts:
- Lower heel (around 15 mm). Suits lifters with good ankle mobility, people who combine squats with deadlifts, and anyone who wants the stability of a hard sole without a large change in posture.
- Medium heel (around 18 to 20 mm). The most common choice for Olympic lifters and general strength training. It gives a noticeable boost in depth without feeling extreme.
- Higher heel (22 mm and above). Favoured by lifters with long femurs or stiff ankles, and by those who prioritise a vertical torso in the catch.
A raised heel does not repair a mobility problem. It lets you reach a position you could not hold comfortably before, and lifters who also work on ankle range often find they need less height over time.
Fit Matters More Than the Spec Sheet
A shoe with ideal specifications still fails if the foot moves inside it. The heel should sit firmly with no lift when you rise onto your toes, and the midfoot should feel locked down without pinching. The toes need room to spread, because a cramped forefoot reduces balance and can cause numbness during long sessions.
Measure your feet in the evening, when they are slightly larger, and wear the socks you lift in. Compare your measurement to the brand’s size chart, since sizing varies between labels and a lifting shoe fits differently from a trainer. If you have wide feet, check whether the model offers extra room across the forefoot, as a rigid upper will not stretch to accommodate you.
Reviews give useful clues. When several buyers say a shoe runs narrow or half a size small, adjust your order accordingly.
Straps, Laces and Uppers
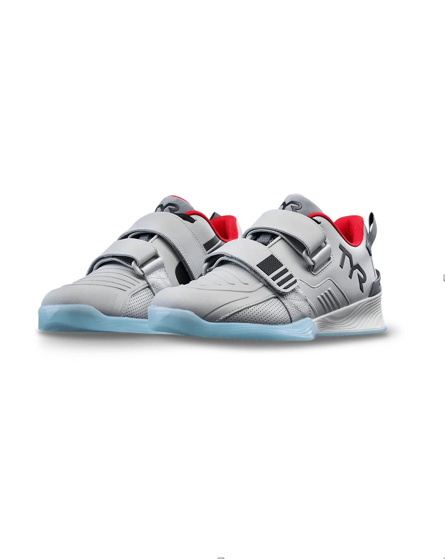
Closure systems affect how securely the shoe holds you. Many lifting shoes use a combination of laces and a midfoot strap. The laces set the general fit, and the strap pulls the arch area tight and stops the foot sliding forward during an explosive pull or a heavy drive out of the hole.
Check how the strap is anchored and whether it presses on the top of the foot. A well-placed strap should tighten the shoe without creating a hot spot. Upper materials matter as well. Sturdy synthetic leather or reinforced mesh keeps its shape under lateral force, while a thin knit can stretch and lose support after a few months of hard use.
Ventilation is worth a glance. Rigid shoes trap heat, so perforations in the right places keep long sessions bearable without weakening the structure.
Match the Shoe to Your Lifts
Different training splits point to different shoes.
An Olympic lifter spends most of the session in deep squat positions and receiving the bar overhead, so a medium to high heel with a strong strap suits the work. A powerlifter who squats low-bar and pulls heavy deadlifts often prefers a lower heel, and some use a flat, thin-soled shoe for pulls to reduce the distance the bar travels. A general strength trainer who squats, presses and does accessory work can use a mid-height heel and wear the same shoe all session.
Mixed conditioning is a different case. A lifting shoe is too rigid for sprints, box jumps and long runs, so lifters who do that kind of work often keep a separate trainer for conditioning days.
Compare Models Side by Side
Once you know the heel height, fit and closure you want, put two or three options next to each other. Browsing the full TYR range makes it easier to see how footwear sits alongside apparel and accessories, and how different models describe their soles and heel heights. Note the specifications for each, then rank them against your own training instead of choosing by appearance.
Pay attention to what the brand says about intended use. A shoe designed for Olympic lifting will emphasise a rigid sole and a raised heel, while a general training model will mention flexibility and versatility. The wording tells you which job the designers had in mind.
Test Before You Commit
Standing in a shoe says little about how it performs under load. Use any trial period properly. Wear the shoes on a clean indoor floor, load an empty bar, and squat to your usual depth. Check for heel slip, pressure points under the strap and any rolling at the ankle. Try a few reps of the lifts you do most, including a pause at the bottom to see how stable the base feels.
Keep the packaging and avoid wearing them outdoors until you are sure, since many return policies require unworn items. Read the exchange terms before ordering so you know what happens if the size is wrong.
What Beginners Can Skip
New lifters do not need to rush into specialist footwear. In the first few months, a flat, firm shoe is enough while you learn to squat, hinge and press with moderate weights. As working loads rise and technique settles, the advantages of a raised heel become easier to feel, and a purchase becomes easier to justify.
The signs that it is time to switch are practical: heels lifting off the floor in the squat, feet sliding inside the shoe, or shoes that squash and roll under heavy sets.
Care and Replacement
Lifting shoes last longer than most trainers because they see less running and walking. Keep them for the gym, let them dry after sweaty sessions, and wipe chalk off the sole so it does not build up and affect grip. Check the strap and stitching occasionally, since these take the most strain.
Replace the pair when the sole cracks, the heel shows visible wear or the shoe no longer holds your foot as firmly as it once did. Loss of stability often shows up first as a subtle wobble in the bottom of a squat.
Getting a Second Opinion
If sizing or fit is still unclear after reading the specifications, you can contact the TYR team before ordering. Mentioning your usual lifts, your foot width and your preferred heel height usually gets a more useful answer than guessing from product photos.
Picking With Your Own Squat in Mind
The right pair is the one that matches how you actually lift: a sole that stays hard under the bar, a heel height that suits your mobility and a fit that keeps the foot still. Check those three things against your own measurements and training, and the decision gets much simpler. After a few weeks in the right shoes, most lifters stop noticing them, and that is a good sign.